# 缓存-Redis
# 简单使用
# 准备一个项目
快速构建一个web项目,实现CURD功能 SpringBoot+MyBatis-Plus+MySQL
- 数据准备,建一个表
biubiu.t_user
create table t_user(
	id int(11) auto_increment comment '编号',
  user_name varchar(50) default '' comment '用户名称',
  pass_word varchar(50) default '' comment '用户密码',
  sex int(3) default null comment '年龄',
  birthday  datetime  comment '生日',
  primary key (id)
)engine=innodb auto_increment =1 comment '用户表';
2
3
4
5
6
7
8
对应的Entity
@Data
@TableName("t_user")
public class User implements Serializable {

    private static final long serialVersionUID = 1L;
    @TableId(type = IdType.AUTO)
    private Integer id;
    @TableField("user_name")
    private String userName;
    private String password;
    private Integer sex;
    private Date birthday;

    //setter and  getter method
}
2
3
4
5
6
7
8
9
10
11
12
13
14
15
- 使用单元测试插入两条测试数据
@SpringBootTest
public class ApplicationTest {
    @Autowired
    private UserService userService;

    @Test
    public void insertUser() {
        User user = new User();
        user.setUserName("biubiu");
        user.setPassword("123456");
        user.setSex(2);
        user.setBirthday(new Date());
        userService.insert(user);
    }

}
2
3
4
5
6
7
8
9
10
11
12
13
14
15
16
# 整合-Redis
- 导包
<dependency>
    <groupId>org.springframework.boot</groupId>
    <artifactId>spring-boot-starter-redis</artifactId>
    <version>1.4.7.RELEASE</version>
</dependency>
2
3
4
5
- 配置
spring:
  ## Redis 配置
  redis:
    ## Redis数据库索引(默认为0)
    database: 0
    ## Redis服务器地址
    host: 192.168.126.129
    ## Redis服务器连接端口
    port: 6379
    ## Redis服务器连接密码(默认为空)
    password:
    jedis:
      pool:
        ## 连接池最大连接数(使用负值表示没有限制)
        #spring.redis.pool.max-active=8
        max-active: 8
        ## 连接池最大阻塞等待时间(使用负值表示没有限制)
        #spring.redis.pool.max-wait=-1
        max-wait: -1
        ## 连接池中的最大空闲连接
        #spring.redis.pool.max-idle=8
        max-idle: 8
        ## 连接池中的最小空闲连接
        #spring.redis.pool.min-idle=0
        min-idle: 0
    ## 连接超时时间(毫秒)
    timeout: 1200
2
3
4
5
6
7
8
9
10
11
12
13
14
15
16
17
18
19
20
21
22
23
24
25
26
27
- 配置类
@Configuration
public class RedisConfig {

    /**
     * 自定义的redisTemplate 注入到Spring容器
     */
    @Bean
    public RedisTemplate<String, Object> redisTemplate(RedisConnectionFactory factory) {
        RedisTemplate<String, Object> redisTemplate = new RedisTemplate<>();
        redisTemplate.setConnectionFactory(factory);

        // 1. Jackson
        Jackson2JsonRedisSerializer<Object> jacksonRedisSerializer = new Jackson2JsonRedisSerializer<>(Object.class);
        ObjectMapper om = new ObjectMapper();
        om.setVisibility(PropertyAccessor.ALL, JsonAutoDetect.Visibility.ANY);
        // om.enableDefaultTyping(ObjectMapper.DefaultTyping.NON_FINAL); 过期了,用下面的替代
        om.activateDefaultTyping(LaissezFaireSubTypeValidator.instance, ObjectMapper.DefaultTyping.NON_FINAL, JsonTypeInfo.As.PROPERTY);
        jacksonRedisSerializer.setObjectMapper(om);
        // 2. String
        StringRedisSerializer stringRedisSerializer = new StringRedisSerializer();

        //key-采用String的序列化方式
        redisTemplate.setKeySerializer(stringRedisSerializer);
        //hash的key-采用String的序列化方式
        redisTemplate.setHashKeySerializer(stringRedisSerializer);
        //value-采用jackson序列化方式
        redisTemplate.setValueSerializer(jacksonRedisSerializer);
        //hash的value-采用jackson的序列化方式
        redisTemplate.setHashValueSerializer(jacksonRedisSerializer);
        redisTemplate.afterPropertiesSet();
        return redisTemplate;
    }

}
2
3
4
5
6
7
8
9
10
11
12
13
14
15
16
17
18
19
20
21
22
23
24
25
26
27
28
29
30
31
32
33
34
- Redis封装工具
在使用 redisTemplate 工具得时候,还是有点麻烦,比如 redisTemplate.opsForValue().set(...) 还是比较麻烦,所以我们自己封装了一个工具类使用!
- 简单使用
@SpringBootTest
public class ApplicationTest {
    @Autowired
    private RedisUtils redisUtils;

    @Test
    public void testRedis() {
        redisUtils.set("name", "张三");
        System.out.println(redisUtils.get("name"));
    }

}
2
3
4
5
6
7
8
9
10
11
12
13
# 请求流程
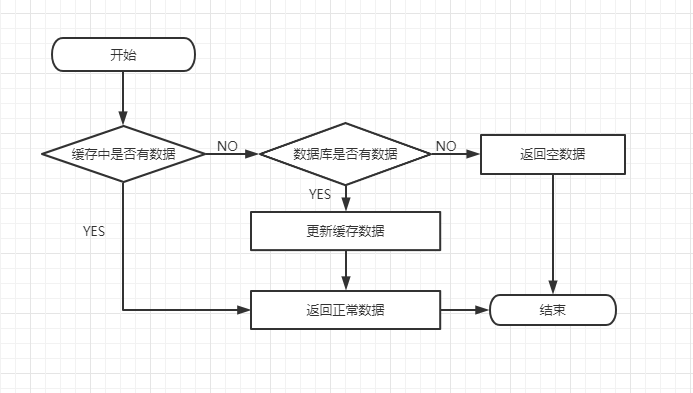
- 请求过来先查Redis
- 缓存没有的话,去查DB;缓存有,直接返回缓存的
- DB查到后刷新到缓存
@RestController
public class UserController {

    private static final Logger log = LoggerFactory.getLogger(UserController.class);

    @Autowired
    private UserService userService;
    @Autowired
    private RedisUtils redisUtils;

    @GetMapping("/users")
    public List<User> queryAll() {
        //1. 先从Redis查询用户列表
        log.debug("读取Redis缓存");
        String userListJson = (String) redisUtils.get("userListCache");
        if (userListJson == null) {
            log.debug("Redis没有,读取DB");
            List<User> users = userService.selectList(null);
            //DB有数据,刷新缓存
            if (users != null) {
                redisUtils.set("userListCache", JSON.toJSONString(users));
                return users;
            }
            return null;
        } else {
            log.debug("从redis缓存取值");
            return JSONObject.parseArray(userListJson, User.class);
        }
    }

}
2
3
4
5
6
7
8
9
10
11
12
13
14
15
16
17
18
19
20
21
22
23
24
25
26
27
28
29
30
31
# SpringCache介绍
在SpringBoot中, 数据的缓存管理存储依赖于Spring框架中cache相关的 org.springframework.cache.Cache 和 org.springframework.cache.CacheManager 缓存管理器接口
如果程序中没有定义类型为CacheManager的Bean组件或者是名为cacheResolver的CacheResolver缓存解析器,SpringBoot将尝试选择并启用以下缓存组件(按照指定的顺序)
-(1)Generic
-(2)JCache (JSR-107)(EhCache 3、Hazelcast、Infinispan等)
-(3)EhCache 2.x
-(4)Hazelcast
-(5)Infinispan
-(6)Couchbase
-(7)Redis
-(8)Caffeine
-(9)Simple
在项目中添加某个缓存管理组件(例如Redis)后,Spring Boot项目会选择并启用对应的缓存管理器。如果项目中同时添加了多个缓存组件,且没有指定缓存管理器或者缓存解析器(CacheManager或者cacheResolver),那么Spring Boot会按照上述顺序在添加的多个缓存中优先启用指定的缓存组件进行缓存管理
Spring Boot默认缓存管理中,没有添加任何缓存管理组件能实现缓存管理。这是因为开启缓存管理后,Spring Boot会按照上述列表顺序查找有效的缓存组件进行缓存管理,如果没有任何缓存组件,会默认使用最后一个Simple缓存组件进行管理。Simple缓存组件是Spring Boot默认的缓存管理组件,它默认使用内存中的ConcurrentMap进行缓存存储,所以在没有添加任何第三方缓存组件的情况下,可以实现内存中的缓存管理,但是我们不推荐使用这种缓存管理方式
当在Spring Boot默认缓存管理的基础上引入Redis缓存组件,即在pom.xml文件中添加Spring Data Redis依赖启动器后,SpringBoot会使用RedisCacheConfigratioin当做生效的自动配置类进行缓存相关的自动装配,容器中使用的缓存管理器是RedisCacheManager, 这个缓存管理器创建的Cache为 RedisCache, 进而操控redis进行数据的缓存
# 注解
SpringCache 提供了 @Cacheable 、@CachePut 、@CacheEvict 、@Caching 等注解,在方法上使用
@EnableCaching
开启缓存功能,一般放在启动类上或者自定义的RedisConfig配置类上
@CacheConfig
当我们需要缓存的地方越来越多,可以使用 @CacheConfig(cacheNames = "cacheName") 注解在 class 之上来统一指定value的值,统一管理keys,这时可省略value,如果你在你的方法依旧写上了value,那么依然以方法的value值为准。
@Service
@CacheConfig(cacheNames = "categories")
public class CategoryServiceImpl implements CategoryService {
    //TODO
}
2
3
4
5
@Cacheable
根据方法对其返回结果进行缓存,下次请求时,如果缓存存在,则直接读取缓存数据返回;如果缓存不存在,则执行方法,并把返回的结果存入缓存中。一般用在查询方法上。
@CachePut
使用该注解标志的方法,每次都会执行,并将结果存入指定的缓存中。其他方法可以直接从响应的缓存中读取缓存数据,而不需要再去查询数据库。一般用在新增方法上
@CacheEvict
使用该注解标志的方法,会清空指定的缓存。一般用在更新或者删除方法上
@Caching
该注解可以实现同一个方法上同时使用多种注解
← 多数据源切换 整合日志Logback →