# Nginx-高性能服务器
# 一、简介
Nginx是一款轻量级的 Web 服务器 、高性能反向代理服务器。
# 1.1 应用场景
- HTTP服务器,nginx可以独立提供http服务。例如静态资源服务器
- FTP服务器
- 反向代理
- 负载均衡
- 虚拟主机,也就是说一台服务器可以启动多个网站
- 网关服务器:接受外网访问,转发请求到内网服务器;也就是说想访问网站,必须走nginx
# 1.2 Linux安装
下载
下载源代码
nginx-1.22.1.tar.gz或者tengine-2.3.3.tar.gzwget http://nginx.org/download/nginx-1.23.3.tar.gz wget http://tengine.taobao.org/download/tengine-2.3.3.tar.gz # 淘宝在Nginx基础上做了增强,二选一即可1
2解压
tar -zxvf tengine-2.3.3.tar.gz1安装依赖库
yum install -y gcc gcc-c++ pcre pcre-devel zlib zlib-devel openssl openssl-devel wget mnttpd-tools vim autoconf automake make1进入解压后的目录,编译安装三部曲
[root@localhost]# cd tengine-2.3.3
[root@localhost]# ./configure --prefix=/usr/local/tengine2.3.3/ --with-http_ssl_module --with-http_flv_module --with-http_gzip_static_module --with-http_stub_status_module --with-threads --with-file-aio
[root@localhost]# make && make install
1
2
3安装完成,启动
安装完成去对应的 sbin/nginx 就可以启动,启动之后如果无法访问首页,注意防火墙配置
[root@localhost]# firewall-cmd --zone=public --add-port=80/tcp --permanent
[root@localhost]# firewall-cmd --reload
[root@localhost]# firewall-cmd --zone=public --list-ports
1
2
3
# 二、基础命令
# 1.命令介绍
| 命令 | 描述 |
|---|---|
nginx -v | 查看Nginx的版本号 |
start nginx | 启动Nginx服务器 |
nginx -t | 将检查配置文件的语法的正确性 |
nginx -s stop | 快速关闭,可能不保存相关信息,并迅速终止web服务 |
nginx -s quit | 平稳关闭,保存相关信息,有安排的结束web服务 |
taskkill /f /t /im nginx.exe | win鲨进程关闭Nginx |
nginx -s reload | 加载配置(不需重启Nginx) |
# 2.重启脚本
win下新建批处理命令 restartnginx.bat
# 杀nginx进程
taskkill /F /IM nginx.exe
# 启动nginx
D:\\nginx-1.11.0\\nginx.exe

# 退出cmd
exit
2
3
4
5
6
7
# 3.安装成系统服务并且开机自启
创建服务脚本
vi /usr/lib/systemd/system/nginx.service编辑脚本内容
[Unit]
Description=nginx - web server
After=network.target remote-fs.target nss-lookup.target

[Service]
Type=forking
PIDFile=/usr/local/nginx/logs/nginx.pid
ExecStartPre=/usr/local/nginx/sbin/nginx -t -c /usr/local/nginx/conf/nginx.conf
ExecStart=/usr/local/nginx/sbin/nginx -c /usr/local/nginx/conf/nginx.conf
ExecReload=/usr/local/nginx/sbin/nginx -s reload
ExecStop=/usr/local/nginx/sbin/nginx -s stop
ExecQuit=/usr/local/nginx/sbin/nginx -s quit
PrivateTmp=true

[Install]
WantedBy=multi-user.target
1
2
3
4
5
6
7
8
9
10
11
12
13
14
15
16重新加载服务
systemctl daemon-reload启动服务并加入开机自启
systemctl start nginx
systemctl status nginx
systemctl enable nginx
1
2
3
# 三、配置文件说明
# 1. 防盗链
防盗链:盗链即是指外部网站引入当前网站的资源对外展示
在http请求头里有个字段 referer,表示请求从哪来的
注意:防盗链配置 只能在location下
location ~ .*\.(html|htm|gif|jpg|jpeg|bmp|png|ico|txt|js|css){
    # 图片不会阻止*.biubiu.com访问  # valid_referers none *.biubiu.com; # none表示没有referer的话可以访问
    valid_referers none blocked  *.biubiu.com *.baijq.com;
    if ($invalid_referer) { # if和{必须有个空格
        return 403;
        # 也可以用url rewrite返回指定图片
        # rewrite ^/  /img/no.jpg;
    }
    root /www/static;
}
2
3
4
5
6
7
8
9
10
# 2. 跨域和开启gzip压缩
# 2.0 大文件上传
对于上传文件,Nginx默认最大为1M client_max_body_size 50m; # 这里修改为50M
| 项目 | 说明 |
|---|---|
client_max_body_size | 设置请求体允许的最大体积 |
client_header_timeout | 等待客户端发送一个请求头的超时时间 |
client_body_timeout | 设置读取请求体的超时时间 |
proxy_read_timeout | 设置请求被后端服务器读取时,Nginx等待的最长时间 |
proxy_send_timeout | 设置后端向Nginx返回响应时的超时时间 |
# 2.1 跨域
nginx放开跨域,可以在http server location等模块新增如下配置
```shell
add_header 'Access-Control-Allow-Origin' '*';                                    # 允许跨域的请求,可以自定义变量$http_origin,*表示所有
add_header 'Access-Control-Allow-Credentials' 'true';                            # 允许携带cookie请求
add_header 'Access-Control-Allow-Methods' 'GET,POST,OPTIONS,PUT','DELETE';       # 允许跨域请求的方法
add_header 'Access-Control-Allow-Headers' '*';                                   # 请求时允许携带的头部信息,例如:"DNT,X-CustomHeader,Keep-Alive,User-Agent,X-Requested-With,If-Modified-Since,Cache-Control,Content-Type"
# 一定要有!!!否则Post请求无法进行跨域!
# 在发送Post跨域请求前,会以Options方式发送预检请求,服务器接受时才会正式请求
if ($request_method = 'OPTIONS') {
    add_header 'Access-Control-Max-Age' 1728000;
    add_header 'Content-Type' 'text/plain; charset=utf-8';
    add_header 'Content-Length' 0;
    # 对于Options方式的请求返回204,表示接受跨域请求
    return 204;
}
```
# 2.2 gzip压缩
开启Gzip
响应头里有Content-Encoding=gzip 说明开启了gzip
#https://www.cnblogs.com/Renyi-Fan/p/11047490.html
gzip on;																# 是否开启GZIP压缩,on
gzip_buffers 32 4k;														# 设置处理压缩请求的缓冲区数量和大小 32x4K=128K的缓冲区
gzip_comp_level 6;														# 压缩级别1-9可选,级别越高越耗时
gzip_min_length 1k;													   	# 最小压缩的阈值,小于1k的压缩意义就不大了
gzip_types text/plain text/css text/xml;                                # 文件类型选择是否压缩,一般都是文本文件需要压缩,比如text/plain application/javascript text/css application/xml text/javascript image/jpeg image/gif image/png;等
gzip_disable "MSIE [1-6]\.";                                            # 配置禁用gzip条件,支持正则。此处表示ie6及以下不启用gzip(因为ie低版本不支持) 再如 ".*Chrome.*";
gzip_vary on;	                                                        # 是否在http响应头添加 "Vary:Accept-Encoding"
2
3
4
5
6
7
8
# 3. loaction配置
精确匹配,最高优先级
location = /abc {  #只能匹配到 http://localhost/abc 得请求
	echo "=/abc"
}
1
2
3以什么开头 startWith
location ^~ /api { #匹配以/api开头得请求,http://localhost/api/xxxRequest
	echo "^~ /api"
}
1
2
3正则匹配
location ~ ^/\w{4}\d{2}[a-z] { # 匹配以`/\w{4}\d{2}[a-z]`这个正则开头得请求
	echo "正则匹配"
}
1
2
3最低优先级
location / {  #匹配所有请求
	echo "/"
}
1
2
3重定向
server {
	listen 80;
	server_name  server_name.com   # 域名

	rewrite .*  https://$server_name$1 redirect;
}
1
2
3
4
5
6配置静态资源
location ~ .*\.(html|htm|gif|jpg|jpeg|bmp|png|ico|txt|js|css) {
     root   /soft/nginx/static_resources;
     expires 7d;
}

location ~*.(gif|jpg|jpeg)$ {
   # 匹配任何以 gif、jpg 或 jpeg 结尾的请求。
}
1
2
3
4
5
6
7
8项目 描述 ~代表匹配时区分大小写 ~*不区分大小写匹配(可以写正则) .*代表任意字符都可以出现零次或多次,即资源名不限制 \.代表匹配后缀分隔符 .(html\|... \|css)代表后缀名为.html等的资源 转发请求,都表示tomcat开头的请求转发到指定机器上
location /tomcat {
    proxy_pass http://192.168.0.14:8080;  # http://localhost/tomcat => http://192.168.0.14:8080/tomcat
}
1
2
3location /tomcat/ { proxy_pass http://192.168.0.15:8080/; # http://localhost/tomcat => http://192.168.0.14:8080/ 访问到8080的根路径上 }1
2
3
# 4. UrlReWrite
location / {
	# http://api.ceshi.com/2.html -> http://api.ceshi.com/index.jsp?pageNum=2
	# 这里正则 /([0-9]+).html 表示匹配 数字.html 比如:100.html -> 转发到 /index.jsp?pageNum=100 然后反向代理给后端tomcat
	# last break redirect:浏览器地址会变化 -> 302 permanent:浏览器地址会变化 -> 301
	rewrite ^/([0-9]+).html$   /index.jsp?pageNum=$1   break;
	proxy_pass  http://127.0.0.1:8080;
}
2
3
4
5
6
7
# 5. 文件/资源管理器
server {
    listen       9000;
    server_name  localhost;
    autoindex   on; # 显示目录
    root   E:\\biubiu;
}
2
3
4
5
6
# 6. 静态资源服务器
# 6.1 root和alias
root是把location后面的直接拼接到root代理的后面alias是把location后面的去掉后拼接到root代理的后面
location /pics/ {
	root  D:/upload/; # http://localhost/pics/1223/java.png -> D:/upload/pics/1223/java.png
	alias D:/upload/; # http://localhost/pics/1223/java.png -> D:/upload/1223/java.png
}
2
3
4
# 6.2 示例配置
把静态文件放到指定路径下,直接通过 http://localhost:9001/访问静态文件夹中得index.html
server {
    listen       9001;
    server_name  localhost;

    location / {
        root   D:\\root\\web; # 静态资源位置
        index  index.html index.htm;
    }
}
1
2
3
4
5
6
7
8
9图片、视频静态资源服务配置
在D:\root下新建了resource资源目录,下面放了两个资源文件夹
- 图片资源 D:\root\resource\img\a.jpg
- 视频资源 D:\root\resource\audio\abc.mp4
#访问 http://localhost/img/a.jpg 相当于访问 D:\\root\\resource\\img\\a.jpg
#可以看成访问root(D:\\root\\resource)下的/img文件夹里的资源
location  /img {
  root  D:\\root\\resource;
}
#~*正则不区分大小写,去掉*则区分 => 映射的是 D:\\root\\resource目录里所有jpg和mp4资源
location ~* .(jpg|mp4) {
  root  D:\\root\\resource;
}
#正则表示D:\\root\\resource目录里以括号里xx结尾的
location ~ .*\.(gif|jpg|jpeg|png|css|js)$ {
  root  D:\\root\\resource;
}
1
2
3
4
5
6
7
8
9
10
11
12
13
# 7. 反向代理,负载均衡
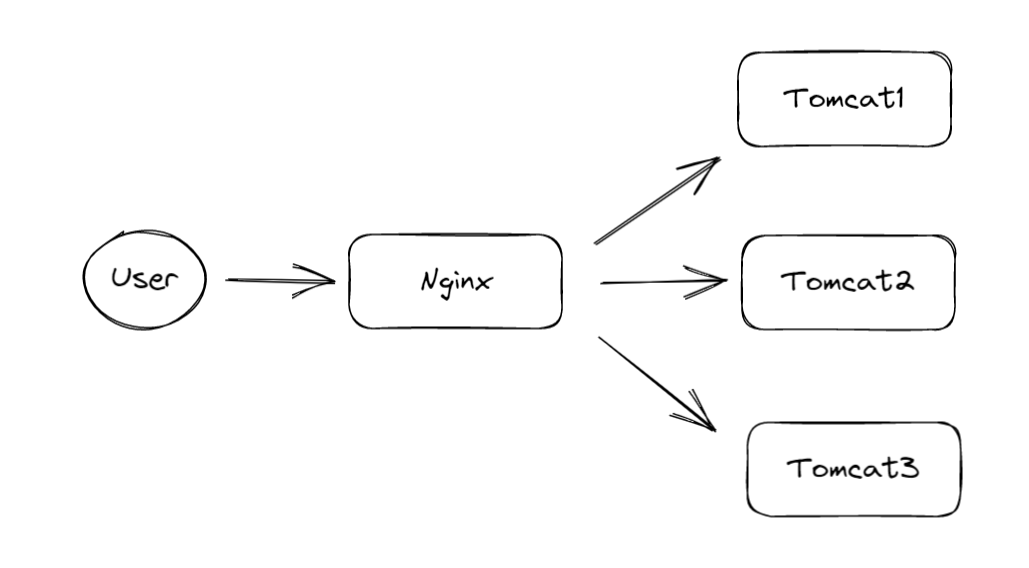
upstream bootserver {
   # 30s内检查心跳发送2次包,未回复就代表该机器宕机,请求分发权重比为1:2
   # 这里的IP请配置成你WEB服务所在的机器IP
   server 192.168.0.000:8080 weight=100 max_fails=2 fail_timeout=30s;
   server 192.168.0.000:8090 weight=200 max_fails=2 fail_timeout=30s;
}

server {
    location / {
        root   html;
        # 配置一下index的地址
        index  index.html index.htm index.jsp;
        proxy_set_header Host $host;
        proxy_set_header X-Real-IP $remote_addr;
        proxy_set_header X-Forwarded-For $proxy_add_x_forwarded_for;
        # 请求交给名为bootserver的upstream上
        proxy_pass http://bootserver;
    }
}
2
3
4
5
6
7
8
9
10
11
12
13
14
15
16
17
18
19
请求链路:
- 由于Nginx监听了192.168.186.101的80端口,所以最终该请求会找到Nginx进程
- Nginx会根据客户端的请求路径会定位到location /{}规则
- 该location中配置的proxy_pass会再找到名为bootserver的upstream
- 最后根据upstream中的配置信息,将请求转发到运行WEB服务的机器处理,由于配置了多个WEB服务,且配置了权重值,因此Nginx会依次根据权重比分发请求
负载均衡方式
轮询(默认)
每个请求按时间顺序逐一分配到不同的后端服务器,如果后端服务器down掉,能自动剔除。
upstream backserver {
    server 192.168.0.14;
    server 192.168.0.15;
}
1
2
3
4加权轮询(weight)
指定轮询几率,weight和访问比率成正比,用于后端服务器性能不均的情况,权重越高,在被访问的概率越大,如下例,分别是30%,70%。
upstream backserver {
    server 192.168.0.14 weight=3;
    server 192.168.0.15 weight=7;
    server 192.168.0.16 weight=7 down; # 下线
    server 192.168.0.17 weight=7 backup; # 备份
}
1
2
3
4
5
6ip_hash 可以解决session问题
upstream backserver {
    ip_hash;
    server 192.168.0.14:88;
    server 192.168.0.15:80;
}
1
2
3
4
5fair(第三方) 按后端服务器的响应时间来分配请求,响应时间短的优先分配。
upstream backserver {
    server server1;
    server server2;
    fair;
}
1
2
3
4
5
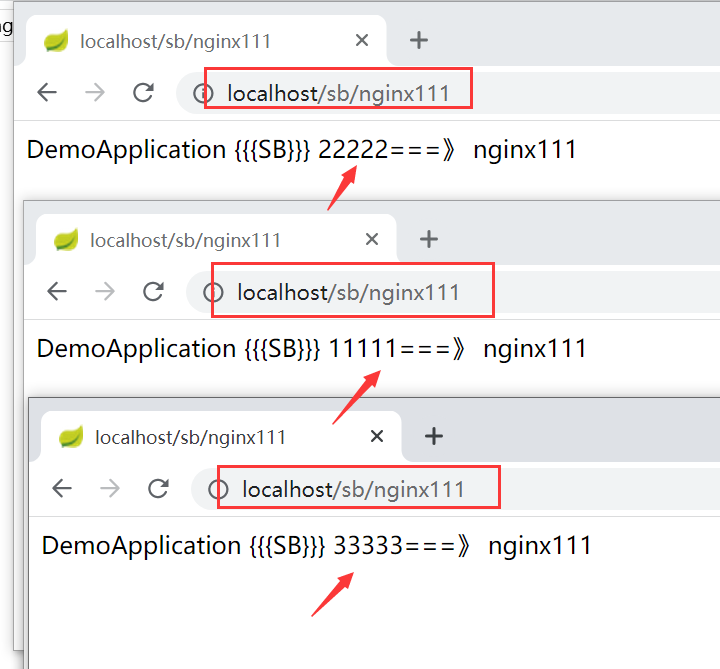
SpringBoot负载均衡
- 准备一个SpringBoot项目,通过不同端口启动,并且测试通过
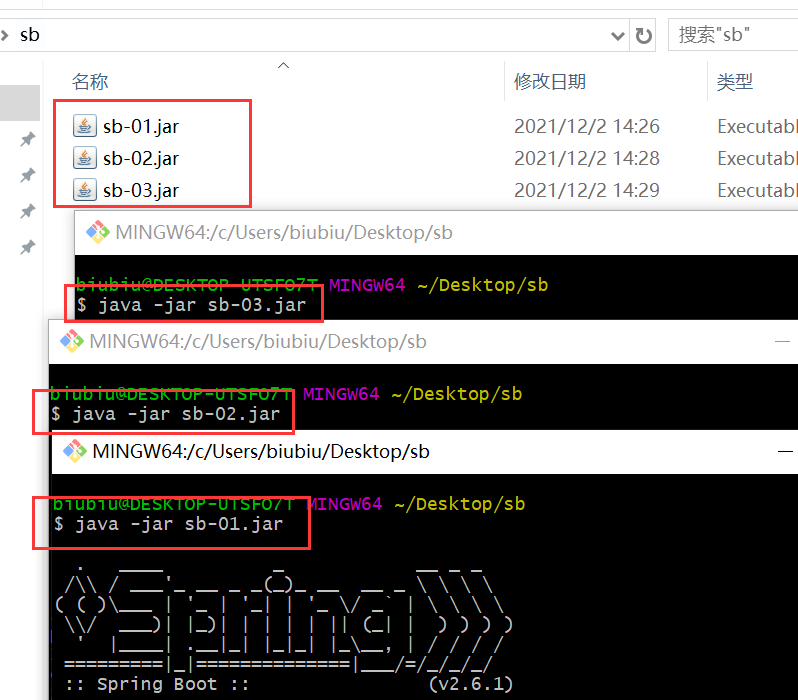
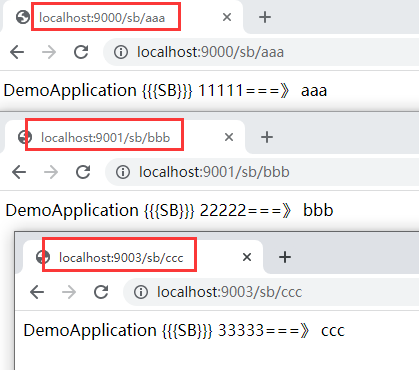
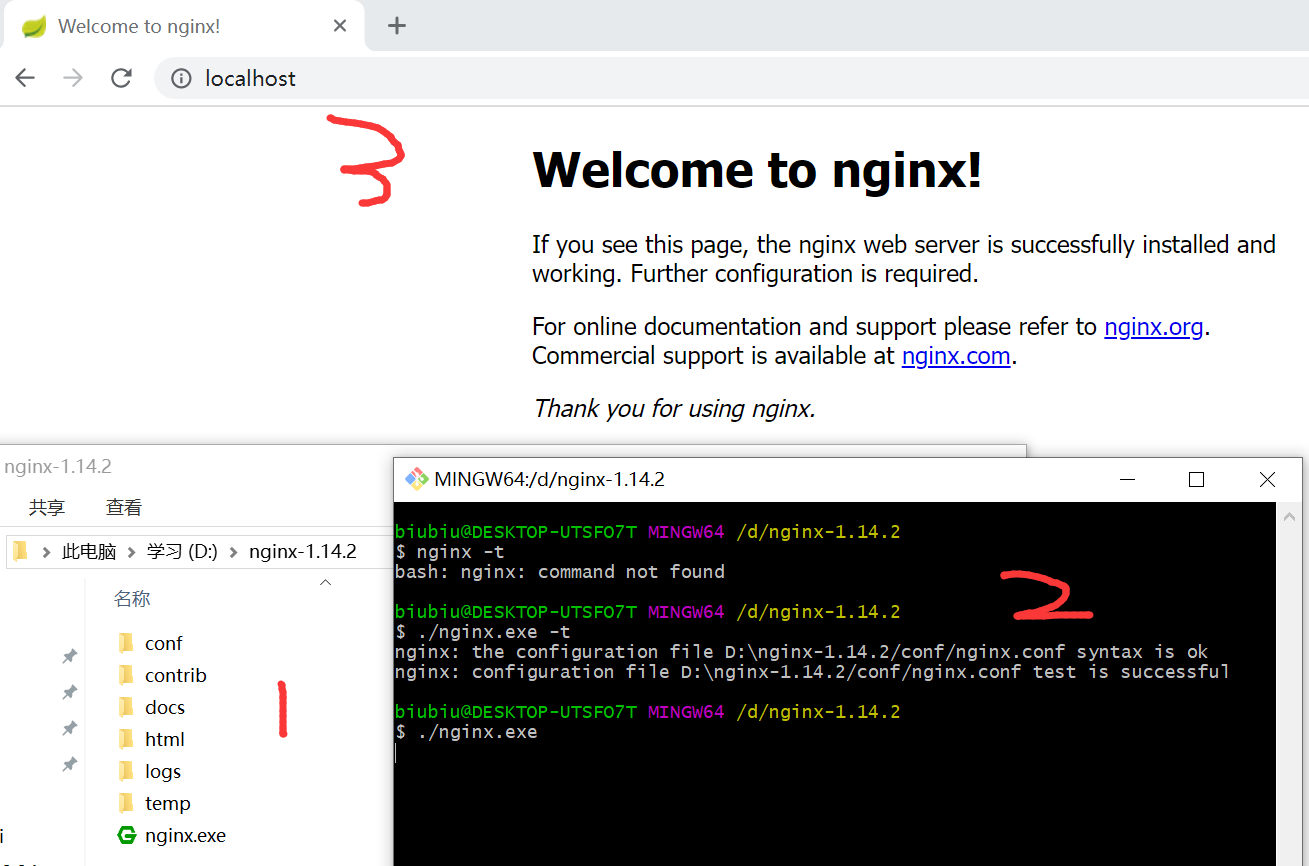
- 下载好的nginx先启动。
http://localhost:80测试通
- 开始配置负载均衡
配置完后可以重启nginx,鲨掉nginx taskkill /F /IM nginx.exe,或者重新加载配置 nginx -s reload
upstream myserver {
    server 127.0.0.1:9000;
    server 127.0.0.1:9001;
    server 127.0.0.1:9003;
}

location / {
	proxy_pass http://myserver;
}
2
3
4
5
6
7
8
9
win nginx注册为windos服务,设置开机自启
需要下载一个软件 WinSW.NET4.exe
复制WinSW.NET4.exe到nginx目录下,重命名为
nginx-server.exe在nginx目录下新增nginx-server.xml配置文件
<service>
	<id>nginx</id>
    <name>nginx</name>
    <description>nginx 反向代理</description>
    <executable>D:\software\nginx-1.20.2\nginx.exe</executable>
</service>
1
2
3
4
5
6开启管理员cmd
cd D:\software\nginx-1.20.2
nginx-server.exe install
# 卸载服务
nginx-server.exe uninstall
1
2
3
4
# 8. https配置
# 8.1 SSL证书
首先去CA机构申请SSL证书,审核通过后下载nginx版。可以去Aliyun申请免费的证书,下载对于的解压。上传服务器对应目录。xxx.key xxx.pem
下载完解压后有三个,
.crt、.key、.pem.crt:数字证书文件,.crt是.pem的拓展文件,因此有些人下载后可能没有.key:服务器的私钥文件,及非对称加密的私钥,用于解密公钥传输的数据,防止泄露.pem:Base64-encoded编码格式的源证书文本文件,可自行根需求修改拓展名
在Nginx目录下新建cert目录,并将下载好的证书/私钥等文件上传至该目录
最后修改一下nginx.conf文件即可
server {
    listen       443;                    # 监听https默认的443端口
    server_name  www.baijq.com;          # 监听项目域名

    ssl  on;                             # 打开SSL加密传输
    ssl_certificate      cert/xxx.pem;   # 配置下载的数字证书
    ssl_certificate_key 	cert/xxx.key;   # 配置证书私钥
    ssl_session_timeout  5m;             # 停止通信时,加密会话的有效期,在该时间段内不需要重新交换密钥
    ssl_ciphers ECDHE-RSA-AES128-GCM-SHA256:ECDHE:ECDH:AES:HIGH:!NULL:!aNULL:!MD5:!ADH:!RC4;
                                         # TLS握手时,服务器采用的密码套件
    ssl_protocols TLSv1 TLSv1.1 TLSv1.2; # 服务器支持的TLS版本
    ssl_prefer_server_ciphers on;        # 开启由服务器决定采用的密码套件

    root   html;
    index  index.html index.htm index.jsp index.ftl;

    location / {
         .....
    }
}

# http转https
server {
   listen 80;
   server_name www.baijq.com;
   return 307 https://$host$request_uri;
}
1
2
3
4
5
6
7
8
9
10
11
12
13
14
15
16
17
18
19
20
21
22
23
24
25
26
27
http访问跳转https return 301 https://$server_name$request_uri;
# 9. IP黑白名单
allow xxx.xxx.xxx.xxx; # 允许指定的IP访问,可以用于实现白名单。 deny xxx.xxx.xxx.xxx; # 禁止指定的IP访问,可以用于实现黑名单。
要同时屏蔽/开放多个IP访问时,如果所有IP全部写在nginx.conf文件中定然是不显示的,这种方式比较冗余,那么可以新建两个文件BlocksIP.conf、WhiteIP.conf:
# --------黑名单:BlocksIP.conf---------
deny 192.177.12.222; # 屏蔽192.177.12.222访问
deny 192.177.44.201; # 屏蔽192.177.44.201访问
deny 127.0.0.0/8; # 屏蔽127.0.0.1到127.255.255.254网段中的所有IP访问

# --------白名单:WhiteIP.conf---------
allow 192.177.12.222; # 允许192.177.12.222访问
allow 192.177.44.201; # 允许192.177.44.201访问
allow 127.45.0.0/16; # 允许127.45.0.1到127.45.255.254网段中的所有IP访问
deny all; # 除开上述IP外,其他IP全部禁止访问
2
3
4
5
6
7
8
9
10
分别将要禁止/开放的IP添加到对应的文件后,可以再将这两个文件在nginx.conf中导入:对于文件具体在哪儿导入,这个也并非随意的,如果要整站屏蔽/开放就在http中导入,如果只需要一个域名下屏蔽/开放就在sever中导入,如果只需要针对于某一系列接口屏蔽/开放IP,那么就在location中导入。
http{
    # 屏蔽该文件中的所有IP
    include /soft/nginx/IP/BlocksIP.conf;
    server{
       location xxx {
           # 某一系列接口只开放给白名单中的IP
           include /soft/nginx/IP/blockip.conf;
       }
    }
}
2
3
4
5
6
7
8
9
10
# 四、日志切割
#!/bin/bash
# 脚本写入crontab 每天0点执行,这是nginx的日志切割脚本

# nginx日志存放点
logs_path=/usr/local/tengine2.3.3/logs
mkdir -p ${logs_path}$(date -d "yesterday" +"%Y")/$(date -d "yesterday" +"%m")
mv ${logs_path}access.log ${logs_path}$(date -d "yesterday" +"%Y")/$(date -d "yesterday" +"%m")/access_$(date -d "yesterday" +"%Y-%m-%d").log

kill -USR1 `cat /usr/local/tengine2.3.3/logs/nginx.pid`
2
3
4
5
6
7
8
9
# 五、最佳实践
worker_processes  1;

error_log  /var/log/nginx/error.log warn;
pid        /var/run/nginx.pid;

events {
    worker_connections  1024;
}

http {
    include       mime.types;
    default_type  application/octet-stream;
    sendfile        on;
    keepalive_timeout  65;
    # 限制body大小
    client_max_body_size 100m;

    log_format  main  '$remote_addr - $remote_user [$time_local] "$request" '
                          '$status $body_bytes_sent "$http_referer" '
                          '"$http_user_agent" "$http_x_forwarded_for"';

    access_log  /var/log/nginx/access.log  main;

    #本地server
    server {
        listen       80;
        server_name  localhost;
        location / {
            root   /usr/share/nginx/html/localhost;
            index  index.html index.htm;
            try_files $uri $uri/ /index.html;
        }
    }

    server {
        listen       80;
        server_name  ruoyikj.top;

        # https配置参考 start
        listen       443 ssl;

        # 证书直接存放 /docker/nginx/cert/ 目录下即可 更改证书名称即可 无需更改证书路径
        ssl on;
        ssl_certificate      /etc/nginx/cert/ruoyikj.top_bundle.crt; # /etc/nginx/cert/ 为docker映射路径 不允许更改
        ssl_certificate_key  /etc/nginx/cert/ruoyikj.top.key; # /etc/nginx/cert/ 为docker映射路径 不允许更改
        ssl_session_timeout 5m;
        ssl_ciphers ECDHE-RSA-AES128-GCM-SHA256:ECDHE:ECDH:AES:HIGH:!NULL:!aNULL:!MD5:!ADH:!RC4;
        ssl_protocols TLSv1 TLSv1.1 TLSv1.2;
        ssl_prefer_server_ciphers on;
        # https配置参考 end

        location / {
            root   /usr/share/nginx/html/ruoyikj.top;
            try_files $uri $uri/ /index.html;
            index  index.html index.htm;
        }

        location ~ /frp/(\d+)/(.*) {
            proxy_set_header Host $http_host;
            proxy_set_header X-Real-IP $remote_addr;
            proxy_set_header REMOTE-HOST $remote_addr;
            proxy_set_header X-Forwarded-For $proxy_add_x_forwarded_for;
            proxy_pass http://127.0.0.1:$1/$2$is_args$args;
            #支持websocket
            proxy_http_version 1.1;
            proxy_set_header Upgrade $http_upgrade;
            proxy_set_header Connection "upgrade";
        }
    }

    server {
       listen       80;
       server_name  m.baijq.com; #修改域名

       location / {
         root    /usr/share/html;
         index  index.html index.htm;
         try_files $uri $uri/ /index.html;
       }

       location /api { # 反向代理
           rewrite   ^.+api/?(.*)$  /$1 break;
           proxy_pass   http://api.baijq.com; #修改为代理服务地址
       }

       error_page   500 502 503 504  /50x.html;
       location = /50x.html {
           root   /usr/share/nginx/html;
       }
    }

}
2
3
4
5
6
7
8
9
10
11
12
13
14
15
16
17
18
19
20
21
22
23
24
25
26
27
28
29
30
31
32
33
34
35
36
37
38
39
40
41
42
43
44
45
46
47
48
49
50
51
52
53
54
55
56
57
58
59
60
61
62
63
64
65
66
67
68
69
70
71
72
73
74
75
76
77
78
79
80
81
82
83
84
85
86
87
88
89
90
91
92